
You can recover most lost frames on Windows 11 without new hardware by updating GPU drivers, trimming startup bloat, enabling built-in gaming features, and disabling a few optional security features when the PC is dedicated to gaming. These changes take under an hour combined and most are fully reversible.
Highest-impact changes, in order:
- Update your GPU driver (clean install with DDU if you're troubleshooting stutter)
- Move active games to an SSD if they're on a spinning drive
- Switch to High Performance or similar high-performance power plans
- Enable Game Mode and Hardware-Accelerated GPU Scheduling (HAGS)
- Audit startup apps and disable launchers, RGB suites, and sync clients
- Disable VBS/HVCI on a dedicated gaming PC to improve performance, though it involves a security trade-off; see the warning below
- Turn off overlays you don't actively use (Discord, Steam, Xbox Game Bar)
- Pause cloud syncs and background downloads before competitive sessions
Safety flags: Driver updates, power plan changes, and startup cleanup are fully reversible. Disabling VBS/HVCI reduces kernel-level protections and should only happen on a machine you don't use for sensitive work. Always create a restore point before touching security features.
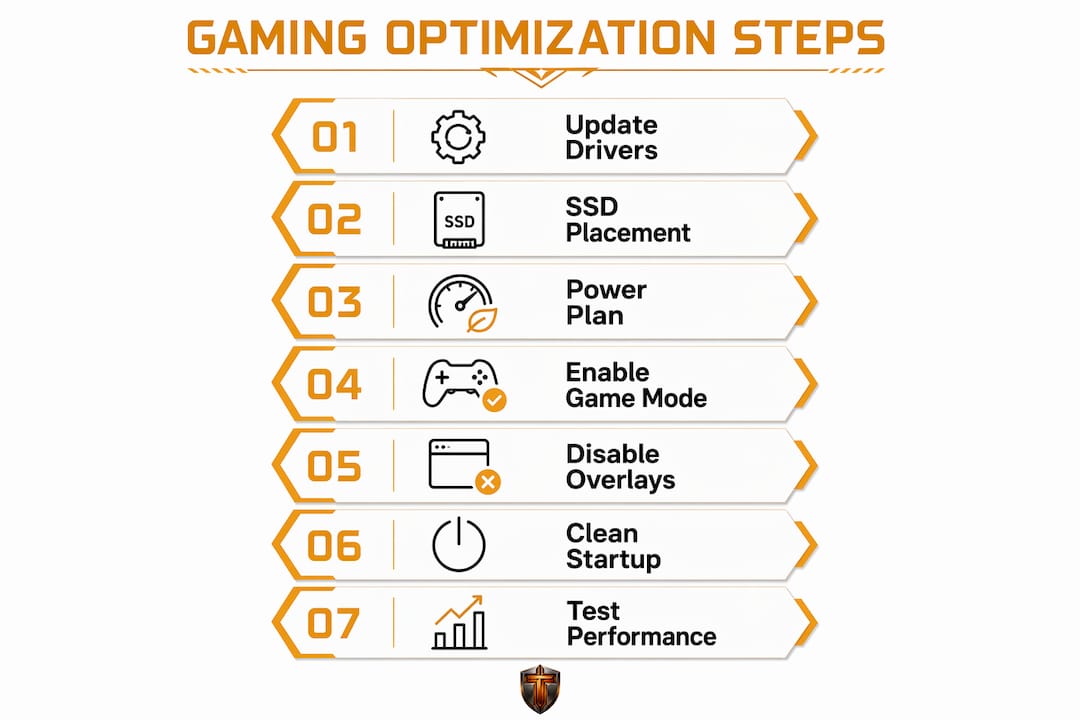
TL;DR checklist: GPU driver → SSD placement → power plan → Game Mode + HAGS → startup cleanup → overlays off → test with a repeatable benchmark → undo anything that doesn't help.
Table of Contents
- What's the fastest way to optimize Windows 11 for gaming?
- How to update Windows, GPU drivers, and firmware safely
- Which Windows 11 gaming features should you enable?
- Do power plan settings actually affect gaming performance?
- Background apps and startup items: what to stop, what to leave
- NVIDIA and AMD control-panel settings that reduce latency
- Does your storage setup cause gaming stutter?
- Overlays, notifications, and display settings that affect gameplay
- How do you test changes and safely roll them back?
- How Tempered automates safe PC optimizations for gamers
- Key Takeaways
- The order I actually test changes on a gaming PC
- Scan your PC with Tempered and apply safe, reversible tweaks
- Useful sources and official documentation
What's the fastest way to optimize Windows 11 for gaming?
A focused 30–60 minute session covers everything that matters. Here's the sequence, with realistic time estimates.
- GPU driver update (10–15 min): Download the latest driver from NVIDIA or AMD directly. If you're chasing stutter, do a clean install with DDU first (see Section 3). Reboot required.
- Move games to SSD (5 min setup, transfer time varies): Right-click the game in Steam or your launcher → Manage → Move install folder. No reinstall needed for most launchers.
- Power plan (2 min): Search "power plan" in Start → Choose High Performance. Ultimate Performance requires a one-time unlock via PowerShell (covered in Section 5).
- Game Mode + HAGS (3 min): Settings → System → Gaming → Game Mode (on). Settings → Display → Graphics → Change default graphics settings → Hardware-accelerated GPU scheduling (on). Reboot.
- Startup cleanup (10 min): Task Manager → Startup apps tab. Disable launchers, cloud sync clients, and RGB software. Leave antivirus and GPU control panel entries alone.
- VBS/HVCI check (5 min): Search "Core isolation" in Settings. If Memory Integrity is on and this is a dedicated gaming PC, disabling VBS/HVCI can yield a noticeable FPS boost on affected systems. Re-enable it if the machine handles sensitive data.
- Overlay audit (5 min): Disable overlays you don't use. Details in Section 9.
- Pre-session habit (1 min): Pause OneDrive, Dropbox, or any cloud sync. Pause Windows Update downloads. This preserves network and disk resources for the game during competitive play.
Steps needing a reboot: Driver install, HAGS toggle, VBS changes. Steps to do right before play: Close overlays, pause cloud sync, check Task Manager for surprise CPU spikes. Cost note: Every step above is free. Tempered's freemium tier covers AI scans and basic recommendations at no cost; paid tiers unlock higher scan limits and premium features for readers who want automated, one-click application.
How to update Windows, GPU drivers, and firmware safely
A current GPU driver is the highest-value software change you can make, full stop. GPU vendors push per-title optimizations with nearly every major release, and a driver that's six months old may be leaving real FPS on the table for games released since then.
Safe update sequence
- Back up first. Create a System Restore Point (search "Create a restore point" in Start) before any driver work.
- Download DDU from Wagnardsoft if you're troubleshooting stutter or crashes. Boot into Safe Mode, run DDU, select your GPU vendor, and choose "Clean and restart." A clean GPU driver install using DDU removes old registry entries and leftover files that cause instability.
- Install chipset drivers from your motherboard vendor's support page (AMD Chipset Software or Intel Chipset Device Software). These affect PCIe bandwidth and memory controller behavior.
- Install the GPU driver from NVIDIA.com or AMD.com directly. Never use Windows Update's driver suggestion for this — it lags behind vendor releases.
- Reboot and test with a repeatable in-game benchmark or a fixed scene you can replay.
When to skip updating
Don't update drivers the night before a ranked tournament or league match. A new driver occasionally introduces regressions on specific titles. If you update and something breaks, roll back via Device Manager → Display adapters → right-click your GPU → Properties → Driver tab → Roll Back Driver.
Pro Tip: Keep a short change log: date, driver version, and a quick note on your test scene result (e.g., "avg 142 FPS, 1% low 98 FPS"). Three entries in a text file takes two minutes and makes rollbacks completely predictable.
Which Windows 11 gaming features should you enable?
Windows 11 ships with several built-in features that directly affect frame latency and consistency. Most are off or unverified by default.
- Game Mode: Settings → System → Gaming → Game Mode. Keep this on for any gaming PC. It deprioritizes background Windows Update tasks and driver installs during active gameplay, which reduces mid-session CPU spikes.
- Optimizations for windowed games: Microsoft's Optimizations for windowed games feature switches the presentation model for compatible DirectX 10/11 titles, which can reduce frame latency in borderless windowed mode. Enable it system-wide under Settings → System → Display → Graphics → Change default graphics settings, or toggle it per-app in the Graphics settings per-application list.
- Hardware-Accelerated GPU Scheduling (HAGS): HAGS shifts GPU memory scheduling from the CPU to the GPU itself, lowering CPU overhead and improving frame pacing in DX12 and Vulkan titles. HAGS helps most on CPU-limited systems and with modern APIs — results vary by driver and game, so enable it, play for a session, and check your 1% lows. For a deeper walkthrough, the HAGS setup guide covers compatibility notes and testing methodology.
- Auto HDR: Useful if you have an HDR-capable monitor, but it adds a small processing step. Test per-game — some titles look better, others introduce color clipping. Toggle it per-app in the Graphics settings list.
- VRR (Variable Refresh Rate): If your monitor supports G-Sync or FreeSync, verify it's enabled in both the Windows display settings and your GPU control panel. Mismatched settings silently disable it.
- Multi-GPU / hybrid systems (laptops): Go to Settings → System → Display → Graphics, find your game executable, and set it to "High performance" to force the discrete GPU. Laptops default to integrated graphics for some titles, which tanks FPS.
"Optimizations for windowed games can reduce frame latency for compatible DirectX 10/11 titles by switching presentation models — Microsoft documents the steps to enable it per-app." — Microsoft Support
Do power plan settings actually affect gaming performance?
Yes, and the difference shows up in 1% lows more than average FPS. Windows' Balanced plan allows the CPU to clock down between frames to save power. Under load that's fine, but during the brief gaps between frames it can cause the CPU to ramp back up too slowly, producing micro-stutters.
Choosing the right plan
- Balanced: Default. Fine for casual play on a laptop running on battery.
- High Performance: Keeps CPU clocks elevated. The practical choice for a desktop or a plugged-in laptop. Search "Choose a power plan" in Control Panel to switch.
- Ultimate Performance: Removes additional power-saving micro-latencies. Not listed by default — unlock it by opening PowerShell as Administrator and running:
powercfg -duplicatescheme e9a42b02-d5df-448d-aa00-03f14749eb61. It then appears in the power plan list.
On a laptop, Ultimate Performance on battery will drain it fast and spin the fans hard. Use it only when plugged in and when thermals allow. For more options, the power plan alternatives guide covers edge cases for handhelds and thin-and-light machines.
Pro Tip: Pair your power plan with the GPU control panel's "Prefer maximum performance" power management setting (NVIDIA) or "Optimized power" set to performance (AMD). Together they prevent both the CPU and GPU from clocking down between frames.
Background apps and startup items: what to stop, what to leave
Startup bloat is one of the most common causes of inconsistent frame times. An RGB suite polling USB devices 60 times per second, a cloud sync client hammering the SSD, and a game launcher auto-updating in the background can each shave frames and spike 1% lows.

What to disable at boot
Open Task Manager (Ctrl+Shift+Esc) → Startup apps tab. Sort by "Startup impact." Disable:
- Game launchers (Steam, Epic, GOG Galaxy) — launch them manually when you need them
- Cloud sync clients (OneDrive, Dropbox, Google Drive)
- RGB and peripheral management suites (iCUE, Synapse, Armory Crate) — launch manually after boot
- Chat apps (Discord, Slack) unless you need them for voice chat during play
Leave enabled: your antivirus/security suite, GPU control panel (if it manages overlay or driver features you use), and any hardware monitoring tool you actively rely on.
Services and security features
Disabling random Windows services is where most guides go wrong. The gains are marginal and the risks are real. The one exception worth knowing: VBS/HVCI can be disabled on a dedicated gaming PC for a measurable performance gain, but it reduces kernel-level protections. If the machine also handles online banking or work files, leave it on.
Overlay and hook contention
Steam's in-game overlay, Discord's overlay, OBS's game capture hook, and RGB software hooks all inject into the game process. Each one adds a small frame-time cost. The cumulative effect of three or four running simultaneously is measurable. Test by disabling all overlays for one session and comparing your 1% lows.
| Optimization | Expected impact |
|---|---|
| Disable startup launchers and sync clients | Reduces disk I/O spikes at boot; frees RAM |
| Disable VBS/HVCI (dedicated gaming PC only) | 5–15% FPS gain on affected systems; reduces kernel protections |
| Remove unused overlay hooks (Steam, Discord, OBS) | Lowers frame-time variance; improves 1% lows |
| Limit background app permissions | Frees CPU cycles during gameplay |
| Pause cloud sync during sessions | Eliminates disk and network contention mid-match |
Warning: Avoid third-party "debloat" scripts and random driver updater tools. They frequently disable services that games depend on, break Windows Update, or install their own background agents — creating problems harder to diagnose than the ones they claimed to fix. Stick to manual, targeted changes or a tool with a documented undo path.
NVIDIA and AMD control-panel settings that reduce latency
The GPU control panel is where you get the last few frames out of a driver without touching Windows settings. Both NVIDIA and AMD expose settings that directly affect CPU-GPU communication latency.
NVIDIA Control Panel and GeForce Experience
- Power Management Mode: Set to "Prefer maximum performance" in Manage 3D Settings → Global Settings. This prevents the GPU from downclocking between frames.
- Low Latency Mode (Ultra): Limits the pre-rendered frame queue to one frame. Reduces input lag noticeably in CPU-bound scenarios. Enable globally or per-game profile.
- Shader Cache Size: Set to "Unlimited" or at least 10 GB. A full shader cache causes stutter on first load of new areas; a larger cache eliminates most of it.
- Texture Filtering Quality: Set to "Performance" for a small FPS gain with minimal visual difference in most titles.
- GeForce Experience auto-optimize: Useful as a starting point for in-game settings, but review its suggestions — it sometimes sets resolution scale below native without flagging it clearly.
AMD Radeon Software
- Radeon Anti-Lag: Enable this in the Radeon Software overlay for supported DX9/11/12 titles. It reduces input latency by synchronizing CPU and GPU work.
- Power Tuning: Set to "Optimized" or manually push the power limit slider up if your card has thermal headroom.
- Shader Cache: Leave enabled. AMD manages this automatically, but verify it's not set to disabled after a driver update.
- Per-game profiles: Radeon Software lets you create per-game profiles. Set Anti-Lag and power tuning per title rather than globally to avoid issues in productivity apps.
- Download drivers only from AMD.com or NVIDIA.com. Never use a third-party "driver updater" tool — they lag behind official releases and sometimes bundle unwanted software.
- After any driver change, run a repeatable benchmark (in-game benchmark or a fixed route in an open-world title) and note average FPS and 1% lows before and after.
- If a new driver hurts performance on a specific title, roll back via Device Manager or reinstall the previous version from the vendor's driver archive.
Does your storage setup cause gaming stutter?
Slow storage is the most underrated cause of mid-game hitching. When a game streams textures or loads a new area, it reads from disk. On an HDD, that read can take 10–20x longer than on an SSD, producing a visible freeze. A current GPU driver and installing games on an SSD produce the largest, most reliable performance gains — more than any registry tweak.
Steps to reduce storage-related stutter
- Move active games to an SSD. Use your launcher's built-in move tool (Steam: Library → right-click game → Manage → Move install folder). No reinstall needed.
- Keep 15–20% free space on the drive holding Windows and your games. Keeping at least 15–20% free prevents texture and shader cache stalls. For a step-by-step cleanup, the disk cleanup guide covers safe ways to free space without touching game files.
- Verify TRIM is active. Open Command Prompt as Administrator and run:
fsutil behavior query DisableDeleteNotify. A result of0means TRIM is enabled. - Check SSD health. A drive with high reallocated sector counts or approaching its TBW (terabytes written) limit will stutter unpredictably. The SSD health check guide walks through reading S.M.A.R.T. data with free tools.
- Pagefile: Let Windows manage the pagefile automatically on modern systems with 16 GB or more of RAM. Manual sizing only helps when you're diagnosing a specific out-of-memory issue. If you have two drives, placing the pagefile on the faster SSD is fine.
- Move shader caches and captures to a secondary drive. Steam's shader pre-compilation cache, NVIDIA's shader cache folder, and Xbox Game Bar captures can each consume several gigabytes. Redirect them to a secondary drive to keep the system SSD clear.
Pro Tip: If you're on a single-drive system, uninstall games you haven't played in 60 days. A 50 GB title sitting idle is 50 GB of free space you could give to active games and Windows.
Overlays, notifications, and display settings that affect gameplay
Every overlay that hooks into a game process adds a small frame-time cost. Most of the time it's negligible. Stack four of them and run a notification-heavy Windows session, and you'll see it in your 1% lows.
Overlays to test disabling
- Xbox Game Bar (Win+G): Settings → Gaming → Xbox Game Bar → toggle off if you don't use it for recording or FPS overlay. The FPS counter alone doesn't justify the hook if you have an alternative.
- Steam overlay (Shift+Tab): Steam → Settings → In-Game → uncheck "Enable the Steam Overlay while in-game." Disable per-game if you need it for some titles.
- Discord overlay: Discord → User Settings → Game Overlay → toggle off. Discord's overlay is one of the more CPU-intensive hooks.
- OBS game capture: If OBS is running in the background without active streaming or recording, close it entirely. The game capture hook adds overhead even when not recording.
Notifications and Focus Assist
Windows 11's notification system can pop a full-screen banner mid-match. Settings → System → Notifications → turn off notifications for apps you don't need during play. Better: enable Focus Assist (Settings → System → Focus) and set it to activate automatically during full-screen games. This suppresses banners and sounds without requiring you to remember to toggle it manually.
Display settings
- Refresh rate: Settings → System → Display → Advanced display → verify your monitor is running at its maximum refresh rate. Windows sometimes defaults to 60 Hz after a driver update.
- Exclusive fullscreen vs. borderless windowed: Exclusive fullscreen gives the GPU direct control of the display, which can reduce latency by a few milliseconds. Borderless windowed is more convenient for multi-monitor setups and works better with Windows 11's Optimizations for windowed games feature. Test both and measure.
- HDR: Windows HDR adds a tone-mapping step. On monitors with poor HDR implementations, it can wash out colors and add latency. Toggle per-game.
Pro Tip: Pause cloud syncs and background downloads right before a competitive session. OneDrive mid-match is a silent FPS killer — it hammers the SSD and eats upload bandwidth simultaneously.

How do you test changes and safely roll them back?
The biggest mistake gamers make with optimization is changing three settings at once and then not knowing which one helped or hurt. One change at a time, with a repeatable test, is the only way to know what actually works on your specific hardware.
Testing workflow
- Capture a baseline. Run a repeatable benchmark before any change: an in-game benchmark tool, a fixed route through an open-world area, or a multiplayer map you can replay. Note average FPS and 1% lows.
- Make one change. Apply it, reboot if required, and run the same test.
- Compare. If average FPS improved and 1% lows held or improved, keep it. If 1% lows dropped (more stutter), roll back.
- Repeat for the next change.
Free tools for measurement
- Xbox Game Bar (Win+G): Built-in FPS counter and CPU/GPU usage overlay. Good for a quick sanity check during play.
- Task Manager Performance tab: Shows real-time CPU, RAM, GPU, and disk utilization. Useful for identifying which resource is bottlenecked.
- In-game benchmarks: Most modern titles (Shadow of the Tomb Raider, Cyberpunk 2077, Forza Horizon 5) include a built-in benchmark. These are the most repeatable option.
- GPU vendor overlays: NVIDIA's FrameView or AMD's built-in performance overlay log frame times to a CSV for post-session analysis.
Rollback strategies
- Driver rollback: Device Manager → Display adapters → right-click GPU → Properties → Driver → Roll Back Driver.
- System Restore Point: Search "Create a restore point" → System Protection → Create. Do this before disabling VBS/HVCI or making any service changes.
- Re-enable VBS/HVCI: Settings → Privacy & Security → Windows Security → Device Security → Core isolation → Memory Integrity → toggle back on.
- Tempered's Undo Center: If you used Tempered to apply optimizations, every change is logged and reversible with one click. No digging through settings menus to remember what was changed.
How Tempered automates safe PC optimizations for gamers
Working through the full checklist above manually takes time, and it's easy to lose track of what you changed. Tempered is an AI-powered diagnostic tool built for exactly this situation: it scans live hardware metrics (CPU, RAM, GPU, disk, uptime), identifies what's actually hurting performance on your specific system, and recommends targeted changes in plain language.
What it does in practice:
- Live diagnostics: Reads real-time CPU, RAM, and GPU temperatures and utilization to find the actual bottleneck, not a generic guess.
- Plain-language recommendations: No registry paths or command-line flags — it tells you what to do and why.
- Safe apply + one-click Undo: Every change Tempered makes is logged in its Undo Center. Reverse anything instantly without hunting through Device Manager or Settings.
- Startup and background process management: Audits startup items and background processes the same way the manual Task Manager steps above do, but surfaces the highest-impact ones first.
- Game Mode enablement: Verifies and enables Game Mode as part of its scan.
- No technical expertise required: The interface is designed for gamers, not sysadmins.
Automation tools with reversible changes reduce the risk of breaking system features compared with manual registry edits and aggressive debloat scripts. Tempered fits that description — it's the safer alternative to running a random PowerShell debloat script you found on a forum.
When to use Tempered vs. manual tuning: If you enjoy the process of testing and learning, do it manually. If you want the gains without the hour-long checklist, Tempered handles the scan, recommendation, and apply steps for you. Either way, the Undo Center means nothing is permanent.
Pro Tip: Even if you prefer manual control, run Tempered's scan first to generate a prioritized list of what it finds. Then apply the top one or two changes manually and validate them. You get the diagnostic intelligence without handing over full control.
Tempered runs on Windows 10 and Windows 11 and is available in the US on a freemium model — free tier for limited AI scans, paid tiers for higher scan limits and premium features.
Key Takeaways
Updating your GPU driver and moving games to an SSD deliver more measurable FPS gains than any registry tweak, and every other optimization on this list builds on that foundation.
| Point | Details |
|---|---|
| Drivers and SSD first | A current GPU driver and SSD game placement are the highest-impact changes before any other tweak. |
| Power plan matters for 1% lows | High Performance or Ultimate Performance reduces CPU clock-down stutters, especially on desktops. |
| Game Mode and HAGS | Enable both in Windows 11 Settings; HAGS helps most in DX12/Vulkan titles on CPU-limited systems. |
| Test one change at a time | Capture baseline FPS and 1% lows, change one setting, retest — never stack changes blindly. |
| Tempered for safe automation | Tempered scans live metrics, recommends targeted fixes, and logs every change for one-click reversal. |
The order I actually test changes on a gaming PC
Most optimization guides treat every setting as equally important. They're not. After working through dozens of Windows 11 gaming setups, the pattern is consistent: drivers and storage account for the majority of recoverable performance, and everything else is refinement.
The surprise that catches people off guard most often is VBS. Windows 11 ships with Virtualization-Based Security enabled by default on new OEM machines, and most users have no idea it's running. On some CPU architectures it costs real frames — not hypothetically, but measurably in a benchmark. The second surprise is shader-cache stutter: a game that ran smoothly for months suddenly hitches after a driver update, not because the driver is bad, but because the old shader cache is now invalid and the GPU is recompiling on the fly. Clearing the cache (or letting it rebuild over one session) fixes it.
Overlays are the third gotcha. Discord's overlay in particular has a reputation for frame-time spikes in specific titles. The fix takes 30 seconds, but nobody thinks to test it because the overlay feels invisible.
My personal sequence: GPU driver first, then SSD check, then power plan, then one session with all overlays disabled to establish a clean baseline. Only after that do I start re-enabling features one at a time. The change log habit — even just a text file with dates and driver versions — has saved hours of guesswork. A tool like Tempered does this logging automatically, which is genuinely useful when you're iterating quickly.
Scan your PC with Tempered and apply safe, reversible tweaks
Manual optimization works, but it takes time and leaves room for error. Tempered gives you a faster path to the same result: an AI scan that reads your actual CPU, RAM, and GPU metrics, identifies the specific bottlenecks on your machine, and recommends targeted fixes in plain language. No command-line flags, no registry paths, no guesswork about which setting to touch.
Every change Tempered applies is logged in its Undo Center, so you can reverse anything with one click — no restore points to manage manually, no digging through Device Manager. That's the real difference from a random debloat script: full reversibility, live diagnostics, and recommendations built around your hardware, not a generic checklist. Tempered runs on Windows 10 and Windows 11 and is available in the US on a freemium model, so you can run your first AI scan at no cost and see exactly what it finds before committing to a paid tier.
Useful sources and official documentation
The following sources were used as evidence throughout this article. They're worth bookmarking for ongoing reference.
- Optimizations for windowed games in Windows 11 — Microsoft Support: The authoritative reference for enabling this feature per-app and system-wide, including compatibility notes for DirectX 10/11 titles.
- How to Optimize Windows 11 for Gaming — GamerHardware.org: Practitioner-level guide covering DDU clean installs, VBS trade-offs, and warnings about debloat scripts. Useful for driver and security sections.
- How to Optimize Windows 11 for Gaming — TheCoreiTech: Covers HAGS behavior, SSD prioritization, and driver impact with practical testing context.
- How to Optimize Windows 11 for Gaming — RigPulse Blog: Covers free-space guidance, pre-session habits (pausing syncs), and the case for reversible automation tools.
- Optimize Windows 11 for Gaming — PerfGamer: Documents VBS/HVCI FPS impact with benchmark context and step-by-step disable instructions.