
If your PC has a hard drive or limited RAM and you're seeing persistent high disk usage after boot, disabling SysMain may be worth testing. On a modern NVMe SSD with ample RAM, you can usually leave it alone. The change is fully reversible, so there's no risk in trying.
Quick decision checklist:
- Disable SysMain if: your machine uses an HDD or slow SATA SSD, you have 8 GB RAM or less, disk usage spikes to 100% shortly after boot, or apps feel sluggish during background activity
- Leave it enabled if: you're running an NVMe SSD with 16 GB or more of RAM and you see no background disk spikes
- Best starting point: set the service to Manual first rather than Disabled — that way Windows can still call on it when needed while you measure the effect
Key Takeaways
SysMain is worth disabling on HDD-based or low-RAM machines, but the safest first step is setting it to Manual and measuring the result before committing to Disabled.
| Point | Details |
|---|---|
| HDD and low RAM benefit most | Machines with HDDs or 8 GB RAM or less are the primary candidates for disabling SysMain. |
| Manual before Disabled | Set startup type to Manual first; only move to Disabled after confirming measurable improvement. |
| Four reversible methods | Services console, Command Prompt (sc), PowerShell, and Registry all work — reboot after any of them. |
| Create a restore point first | Before any registry edit, create a System Restore point so you can roll back in under a minute. |
| Tempered automates the process | Tempered diagnoses which services actually affect your hardware and applies reversible changes with one-click Undo. |
Table of Contents
- What SysMain (formerly Superfetch) actually does
- Why SysMain can cause high disk, CPU, or memory usage
- When you should try disabling SysMain
- How to disable SysMain — four methods, step by step
- How to re-enable SysMain if you need it back
- Safety checklist before editing the registry or changing services
- How to measure whether disabling SysMain helped
- Why "Manual" beats "Disabled" — and when to consider a smarter tool
- One thing most guides get wrong about SysMain
- Tempered gives you safer, reversible Windows optimization
- Sources
What SysMain (formerly Superfetch) actually does
SysMain is a Windows background service that preloads frequently used apps into RAM so they launch faster the next time you open them. It works by analyzing your usage patterns over time, then staging those files in memory during idle periods. Microsoft introduced it as "Superfetch" in Windows Vista and kept it through Windows 10 and 11 under the renamed SysMain label.
The logic was sound for its era. On spinning hard drives, fetching data from disk takes measurably longer than reading from RAM, so pre-staging files gave a real speed advantage. On a modern NVMe drive, that gap shrinks considerably, which is why the service matters far less on current hardware than it did a decade ago. You can confirm the service's behavior and purpose directly in Microsoft's own Q&A documentation.
Why SysMain can cause high disk, CPU, or memory usage
The service becomes a problem when the cure is worse than the disease. On an HDD, SysMain's constant read/write activity competes with everything else the system is trying to do, and the disk simply can't keep up. The result is a feedback loop: the system is slow, so SysMain works harder, which makes the system slower.
Symptoms that point to SysMain as the culprit:
- Disk usage sits at or near 100% in Task Manager for several minutes after boot
- The
svchost.exe (SysMain)process appears near the top of the Disk or CPU column in Task Manager - RAM usage climbs unexpectedly even when no applications are open
- Background disk activity continues long after startup, audible as clicking or grinding on an HDD
- App launches feel slower than expected despite the machine being "idle"
To confirm, open Task Manager (Ctrl+Shift+Esc), click the Disk column header to sort by disk usage, and look for Service Host: SysMain. Resource Monitor (search "resmon" in the Start menu) gives a more granular view: under the Disk tab, filter by the SysMain process to see exactly which files it's reading and writing.
When you should try disabling SysMain
Not every machine benefits from turning this off. Systems with HDDs or limited RAM tend to see the most tangible improvement, while modern hardware often sees no measurable change at all.
Disable SysMain if your machine checks any of these boxes:
- Running a traditional hard drive (HDD) or a slow SATA SSD
- 8 GB of RAM or less installed
- Disk usage regularly hits 100% in the first 5–10 minutes after boot
- You notice the slowdowns correlate with the SysMain process in Task Manager
- The machine is used as a light-duty or older PC where background preloading adds no value
Leave SysMain enabled if:
- Your primary drive is an NVMe SSD
- You have 16 GB or more of RAM
- Task Manager shows no unusual disk or CPU activity from the SysMain process
The safest approach is a temporary test: set the service to Manual for a few days, measure the difference, and only move to Disabled if the improvement is clear and stable.
How to disable SysMain — four methods, step by step
Disabling SysMain is reversible whether you use the Services console, Command Prompt, PowerShell, or the Registry. Reboot after any method to make sure the change takes effect. All four approaches require administrator privileges.
Before editing the registry: create a System Restore point first. Open the Start menu, search "Create a restore point," click Create, name it something like "Before SysMain edit," and confirm. A restore point takes under a minute and gives you a clean rollback if anything goes wrong. Registry edits without a restore point are a gamble not worth taking.
Method 1: Services console (easiest)
- Press Win+R, type
services.msc, and press Enter - Scroll down and double-click SysMain
- Click Stop to halt the running service
- Change Startup type to Manual (recommended for testing) or Disabled
- Click Apply, then OK
- Reboot
Method 2: Command Prompt (fast, copy/paste ready)
Open Command Prompt as administrator (search "cmd," right-click, Run as administrator), then run:
sc stop "SysMain"
sc config "SysMain" start=disabled
Note the space between start= and disabled — the sc command is picky about that syntax. To set it to Manual instead, replace disabled with demand.
Method 3: PowerShell
Elevated PowerShell is a reliable, official approach for managing SysMain's startup type. Open PowerShell as administrator and run:
Stop-Service -Name SysMain -Force
Set-Service -Name SysMain -StartupType Disabled
Verify the change immediately with:
Get-Service -Name SysMain
The output should show Status: Stopped and StartType: Disabled. To set it to Manual instead, replace Disabled with Manual in the Set-Service command.
Method 4: Registry editor
The registry path for SysMain is HKEY_LOCAL_MACHINE\SYSTEM\CurrentControlSet\Services\SysMain, and the value to change is Start. The default value is 2 (Automatic). Set it to 4 to disable the service, or 3 for Manual.
- Press Win+R, type
regedit, press Enter - Navigate to
HKEY_LOCAL_MACHINE\SYSTEM\CurrentControlSet\Services\SysMain - Double-click the Start DWORD value
- Change the value data to
4(Disabled) or3(Manual) - Click OK and reboot
Pro Tip: If Windows resets SysMain after a major update, the administrator-level PowerShell or sc command is more reliable than the GUI. Some users find the Services console change gets reverted; forcing the state via command line tends to stick.
How to re-enable SysMain if you need it back
The whole point of testing is that you can undo it. Re-enabling takes less than a minute by any method.
Services console:
- Open
services.msc, double-click SysMain, set Startup type to Automatic, click Start, then Apply and OK
Command Prompt (administrator):
sc config "SysMain" start=auto
sc start "SysMain"
PowerShell (administrator):
Set-Service -Name SysMain -StartupType Automatic
Start-Service -Name SysMain
Confirm it's running with Get-Service -Name SysMain — the status should read Running. The service picks up its normal preloading behavior after the next reboot, so you don't need to do anything else.
Safety checklist before editing the registry or changing services
Registry edits are low-risk when done carefully, but "carefully" means taking two minutes to set up a fallback before touching anything.
- Create a System Restore point (Start → "Create a restore point" → Create)
- Note the original Start value in the registry before changing it (default is
2) - Confirm you have administrator rights — the UAC prompt should appear when you open regedit or an elevated terminal
- Back up important files if you're making multiple system changes in one session
If something goes wrong: open the Start menu, search "System Restore," and follow the wizard to roll back to the restore point you created. Alternatively, revert the registry
Startvalue back to2manually, or openservices.mscand set the Startup type back to Automatic. If the system won't boot normally, access System Restore from the Windows Recovery Environment (hold Shift while clicking Restart).
For most users, the Services console or Command Prompt method carries essentially zero risk. The registry method is equally safe when you've created a restore point first. If you're uncomfortable with any of these steps, the Services console is the most forgiving option.
How to measure whether disabling SysMain helped
Don't rely on gut feel. A quick before/after test takes about 10 minutes and gives you a real answer.
Before disabling (baseline):
- Open Task Manager → Performance tab → note disk %, CPU %, and memory usage at the 5-minute mark after a cold boot
- Time how long it takes to boot to a usable desktop (a stopwatch on your phone works fine)
- Launch two or three apps you use daily and note how long each takes to open
After disabling and rebooting:
- Repeat the same measurements under the same conditions
- Check Task Manager's Disk column — the
svchost.exe (SysMain)entry should be gone or near zero - Use Resource Monitor for a more detailed disk activity breakdown if the improvement isn't obvious
Pro Tip: Run the test across 2–3 cold boots before drawing conclusions. Boot times vary by a few seconds naturally, and a single data point can mislead. Average the results across multiple restarts for a cleaner signal.
For a deeper look at what's consuming disk I/O, clearing temp files before your baseline test removes noise from other background processes and gives SysMain's impact a cleaner read.
Why "Manual" beats "Disabled" — and when to consider a smarter tool
Experts consistently recommend setting non-essential services to Manual rather than Disabled. The reason is practical: Manual lets Windows start the service on demand if something needs it, while Disabled cuts it off entirely. For SysMain specifically, Manual is the right starting point because it stops the constant background preloading while keeping the service available if a future Windows update or application depends on it.
The case for Manual over Disabled:
- Reduces background disk and RAM consumption without breaking anything
- Preserves the ability for Windows to use the service when it genuinely needs to
- Easier to monitor: if performance degrades after setting to Manual, you have a clear data point
- Aligns with the surgical, reversible approach that experienced Windows administrators use across the board
If you're managing multiple services at once — SysMain, Windows Search, Connected User Experiences, and others — doing it manually across four methods per service gets tedious fast; this is where proven operational efficiency approaches can simplify your workflow. A tool that identifies which services are actually consuming resources on your hardware, explains what each one does, and applies changes with one-click undo is a more practical path for most users. That's exactly what Tempered does, and it's worth considering if you want broader Windows 11 optimization without the manual registry work.
One thing most guides get wrong about SysMain
Most articles treat disabling SysMain as a binary: either it's causing your problems and you should kill it, or it's fine and you should leave it. That framing misses the more useful question, which is why the service is behaving aggressively on your specific machine.
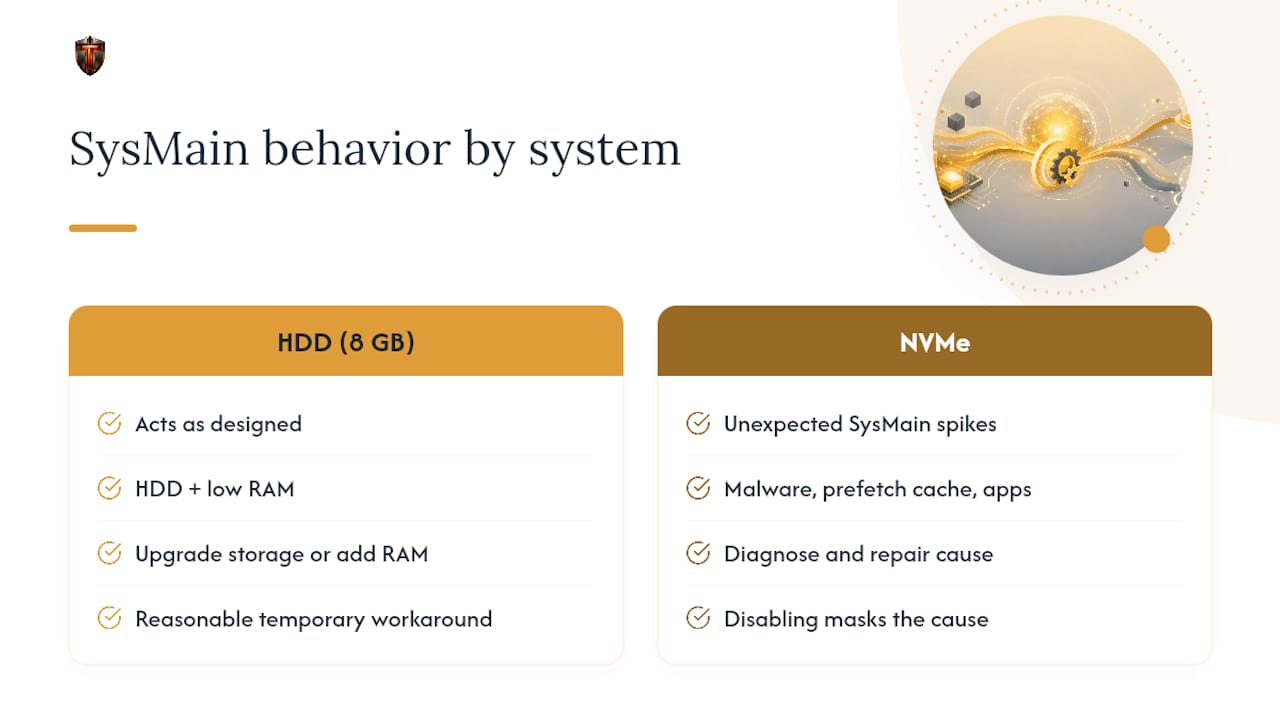
On an HDD with 8 GB of RAM, SysMain isn't misbehaving — it's doing exactly what it was designed to do, just on hardware that can't handle the load. The real fix is either the hardware upgrade (NVMe SSD, more RAM) or the service change. Disabling SysMain on that machine is a reasonable workaround, not a permanent solution.
On an NVMe machine where SysMain is somehow still spiking, the culprit is usually something else entirely: a malware scan running under the SysMain process name, a corrupted prefetch cache, or a conflicting third-party app. Disabling SysMain in that case treats the symptom without touching the cause. Check the best PC optimizer options if you want a diagnostic approach rather than a manual toggle.
The test-first, measure-after method described in this article works precisely because it forces you to look at the data rather than assume.
Tempered gives you safer, reversible Windows optimization

Manually editing services and registry keys works, but it puts the entire diagnostic burden on you. Tempered takes a different route: it scans your live hardware metrics — disk usage, CPU, RAM, startup load — and tells you exactly which services and settings are dragging your system down, with plain-language explanations for each one.
Every change Tempered suggests comes with a one-click Undo. No guessing which registry value you changed three weeks ago, no hunting through services.msc to remember what you set. If disabling SysMain (or any other service) doesn't help, you reverse it in seconds. The free tier gives you limited AI scans to start; paid plans on Tempered unlock unlimited diagnostics and the full optimization suite. It's the controlled, data-driven alternative to manual tweaking.